Why Tile Floors Still Look Dirty After Mopping And What To Do About It
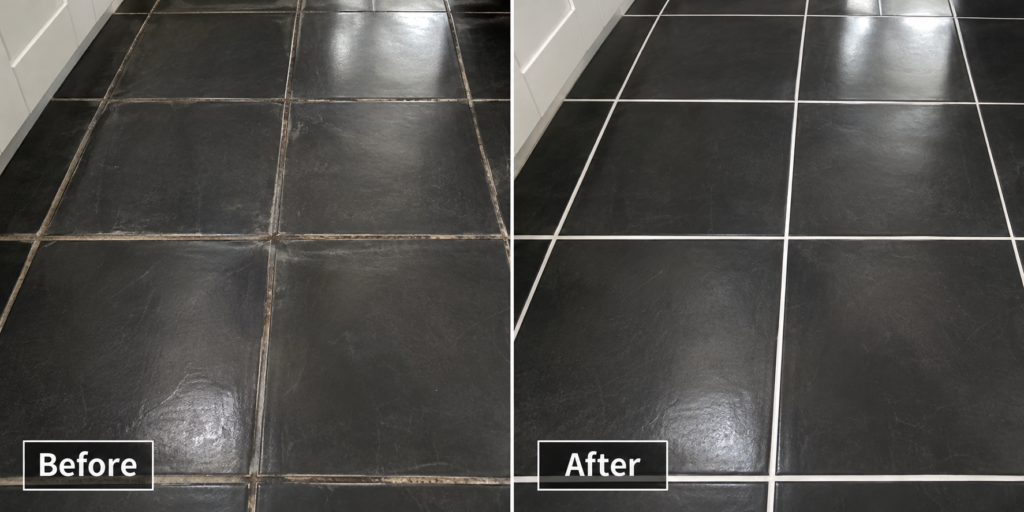
You’ve washed the kitchen floor, put the bucket away and given yourself a small pat on the back. Then the tiles dry. There are streaks across the doorway, a cloudy film by the cooker and footprints where nobody was supposed to walk. What happened? And not to mention that grout that’s grey again now…it can be frustrating.
Three things cause most of this:
- The mop has spread fine dirt around without lifting it.
- Detergent has been left behind on the tiles.
- Or the mop never reached the dirt sitting down in the grout lines and the texture of the tile.
Now and then the marks are something else altogether, such as old polish, mineral residue, a damaged finish or moisture coming up through the floor, and for those another round with a stronger cleaner can make things worse.
Before You Reach For The Mop Again
Let the floor dry completely, then have a good look at it (ideally in natural daylight).
Walk around it. Crouch down if your knees allow. Some marks only show from one angle, others glare at you wherever you stand. Here’s what to look for:
For effective grout cleaning, it’s essential to use the right tools and techniques.
● Streaks that follow the direction of the mop
Streaks that run the same way you mopped usually mean the dirt got spread about, the solution went on unevenly, or it was left to dry where it sat.
A slightly sticky feel underfoot is another clue. Pick a spot nobody will notice and wipe it with a clean, damp cloth, as long as the floor’s care instructions allow it. If a film comes away, you’ve found at least part of your problem.
Tips for Effective Grout Cleaning
● Dark grout lines
Start with a simple question: what colour was the grout to begin with? Some joints go dark when wet and lighten as they dry. That’s normal. Others have changed colour for good through wear, staining or past cleaning. A dark patch by the skirting board that keeps coming back in the same spot is different, and worth a closer look for damp.
● White marks
A chalky film could be leftover detergent, residue from when the tiles were laid, or mineral salts. Annoyingly, all three look much the same when you’re standing over them. There’s more on telling them apart further down.
● Dull or rough patches
Not every mark is dirt. If a dull patch looks exactly the same after a gentle clean, there’s a fair chance the finish on your tiles is worn or damaged.
Scrubbing at surface damage is a bit like washing a scratched window. You can keep at it all afternoon and the scratch will still be there when you finish.
Your Mop Is Moving Soil Around
A dirty mop can look very busy while cleaning almost nothing.
As you mop, it picks up dust, grit and everyday grime. Before long, your bucket water starts looking rather murky. Keep dipping the mop into that same water, and you’re spreading the dirt right back onto your tiles. Some of it settles into the grout lines, leaving them looking grubby even after the floor dries.
It’s the same on a bigger scale in a café corridor or a small shop. The cleaner starts at the entrance, works towards the back and is still on the first bucket. By the last aisle the mop is carrying a fair sample of everything the customers walked in. It has covered the floor, no question. Whether it has taken any dirt away is another matter.
The fix is to keep clean solution and dirty water apart as far as your kit allows. Two buckets help, one for the solution and one to rinse the mop in. So does changing the solution once it’s visibly dirty, rinsing or swapping pads, and cleaning in sections small enough to finish properly. The exact setup matters less than stopping the dirt you’ve collected from going straight back onto the tiles.
Where you can, work from the cleaner end of the room towards the dirtier end. Change the water when it stops doing its job, even if there’s only a corner left. If you use flat-mop pads, bring enough clean ones for the whole space. One pad can’t clean an entire entrance and then do the staff kitchen as well.
There’s also a difference between loosening dirt and getting it off the floor. Collecting the dirty liquid, with a wet vacuum works well round grout joints. If your mop keeps leaving heavy grime behind, the missing step is probably recovery, and more detergent won’t supply it.
Most homes don’t need extraction equipment. A sound floor with light dirt does fine with clean tools and a product used as directed. Badly soiled grout or a big commercial floor is different, and there a process that takes the loosened dirt away will beat one that spreads it thinner.
The Grit Is Still On The Floor
Think of your hallway in a wet week. The trouble often starts before the mop has even touched the tiles. Shoes bring in sand, grit, muddy water and the odd bit of leaf. Then along comes a wet mop, which turns the fine stuff into a paste and drags it out to the edges of the room. Once the water dries, you’d swear nobody had cleaned the floor at all.
So get the loose stuff up first. A soft brush will do it. So will a dust mop, or a vacuum with a hard-floor head, depending on your tile and what its care instructions say. Don’t skip the awkward bits either: along the skirting, under the radiator, round the edge of the doormat. That’s where grit likes to gather, and your first wet pass will pull it straight back out into view.
You’ll notice the biggest difference on textured tiles. Those tiny hollows in the surface hang on to dirt even when the high points look clean. Rough, outdoor-style porcelain laid indoors is a common example, and it needs careful dry cleaning plus a pad that suits the texture. A word of caution, though. Don’t assume the stiffest brush is the right one, because some surfaces and protective treatments scratch far more easily than you’d expect.
A doormat helps, as long as it suits the building, gets cleaned and lies flat. Let it fill up with grit and it starts handing the stuff out. If you run a shop, your mat also has to work with accessibility, door clearance and slip risk. At home it’s simpler. Just watch for a curled edge, because a trip hazard is no improvement on a dirty floor.
There’s an easy test you can try this week. Vacuum one small patch by the entrance really thoroughly, then mop it. Mop the patch next to it the way you normally would. If the vacuumed patch dries noticeably cleaner, sort out your dry cleaning before you even think about changing detergent. In a workplace, it’s also worth looking at where muddy shoes first hit the floor. Moving the entrance mat, or fitting a bigger one, can cut down how far the grit travels, provided the new arrangement is safe.
Remember, sand and grit are abrasive. Leave them down and your next clean will grind them across the finish, so get rid of them first.
Detergent Is Staying On The Tiles
Too much detergent can leave a floor looking dirtier than before you started. Extra product doesn’t turn into extra cleaning power. If the solution is too strong, or a cleaner that needs rinsing is left to dry, a residue stays on the tiles and in the grout.
You’ll see it as a cloudy surface, shiny smears, a slightly tacky feel, or footprints that appear the moment people start walking on it. Fine dust sticks to the film and shows it up again. On some floors the residue also reduces grip, and then it has stopped being about looks.
Read the label of the product you actually used. Does it give a dilution? Is it for routine cleaning or for an occasional deep clean? Does it need a set contact time, a rinse afterwards or the dirty solution picking up? Products differ. A proper no-rinse cleaner used as directed is a different thing from a concentrated detergent left on the floor by accident.
Measure it. A casual extra splash into a half-full bucket can change the strength a good deal. Where a workplace has a dosing dispenser, check that it’s working and that staff know how to use it. That training matters just as much for a mop and bucket as for a complicated machine.
If you suspect detergent film, don’t put a second product on top of the first. Check the care directions, then try a clean-water rinse on a small area and pick the water up again, if the floor and the original product allow it. Let the patch dry completely before you decide whether the film has gone.
The Cleaner Does Not Match The Mess
A kitchen floor coated in cooking grease has a different problem from a shower floor covered in body oils and soap scum. An office entrance collects outdoor dirt and a general traffic film. The same everyday cleaner might handle one of those well and struggle with the others.
You can’t judge a floor cleaner by how fierce the label sounds. A good one has clear instructions, suits your tile and grout, and is meant for the kind of dirt you’ve got. A mild maintenance detergent is right for ordinary day-to-day cleaning. Stubborn grease may need a degreaser that’s safe for the floor, used at the stated dilution and removed the way the label says.
Mineral deposits need more thought. An acidic descaler sounds like the logical answer, but acid damages cement grout and etches acid-sensitive stone such as limestone, marble and travertine. Identify the surface and read its care instructions before you consider any specialist treatment.
If a clean didn’t work, don’t start combining whatever’s in the cupboard. Never mix bleach with ammonia, acids or other cleaning products. Don’t use anything out of an unlabelled bottle either, or pour products into a machine that isn’t meant to take them.
A floor that’s still greasy after a mild wash may well need a different product. A floor with a broken glaze doesn’t, and telling the two apart saves you wasted effort and possibly a repair bill.
Textured Tiles And Grout Are Holding Dirt
Grooves trap dirt that a flat mop can barely reach. Grout lines have the same problem because they sit slightly below the tile surface (a common problem with grease and food residue in kitchens)
Use a soft nylon brush or suitable cleaning pad to reach those awkward spots. Let your cleaner work for the recommended time before gently scrubbing. Easy does it. You’re removing dirt, not excavating the grout.
For larger commercial floors, a suitable cleaning machine can make the job easier, provided its brushes and settings are appropriate for the surface.
An Old Coating May Be Getting In The Way
Tiles sometimes pick up layers nobody meant to keep. A previous occupier put on a shine treatment. A cleaning team used a polish made for another type of floor. Nobody maintained it or took it off. Months later the tiles look smeary even after a careful wash.
An old coating traps dirt, wears unevenly and goes cloudy and patchy. Washing takes off the dirt on top and does very little to the layer underneath. It’s tempting to put on a fresh coat and hope it evens things out. Often that makes matters worse, particularly if the new product doesn’t get on with the old one or the tile was never meant to be polished.
Not every sealer is a surface coating. Penetrating sealers sit inside porous materials and are looked after differently. And plenty of glazed ceramic and porcelain floors gain nothing from shine products. Go by the floor’s original specification if you can find it.
This is a good moment for a small professional assessment, because coating strippers can be harsh even where the tile seems tough. Take off the wrong layer, or use the wrong stripper on natural stone, and the colour or texture can change permanently. Testing matters on commercial anti-slip floors too, where a glossy finish may alter the grip underfoot.
Look for an uneven sheen along the routes people walk, darker patches round the edge of the room and places where the finish is flaking or peeling. Treat those as clues to follow up. They aren’t an invitation to start scraping. If you can’t identify the coating, don’t experiment across the whole floor.
If you manage a rented property or commercial premises, check the maintenance records and handover documents before you commission any coating removal. There may be an approved finishing system with its own maintenance cycle. Photograph the affected patches, and note whether the sheen is different under furniture or in corners nobody uses. Details like that help a flooring specialist tell ordinary dirt from a treatment that has aged unevenly, and spare the floor a string of chemicals that don’t suit it.
White Marks Are Not Necessarily Dirt
White lines appear as the floor dries, and your first instinct is to wash it again. Fair enough. Sometimes that’s all it takes, because the mark was a simple cleaning deposit. Other times, the white material is coming out of the floor itself and your mop bucket has nothing to do with it.
There are four usual suspects.
- Detergent residue tends to follow where your solution was applied or left to pool.
- Grout haze dates from installation and shows as a fine film on the tile faces.
- Hard-water deposits build up where water splashes and dries over and over, mostly round wet areas.
- Then there’s efflorescence: soluble salts carried to the surface by moisture moving through the floor, and left behind when the water evaporates.
True efflorescence normally needs more moisture than you’d ever put down with a mop. So if white powder keeps coming back at the same grout joints, find out where that moisture is coming from, above all on a ground-floor slab or near a long-running leak.
Don’t be fooled by a white mark that vanishes when you wet it. It hasn’t necessarily gone. Often it’s just harder to see until the water evaporates again. A detergent film, on the other hand, should get better once you’ve rinsed the residue away properly. And if the deposit is a dry powder on natural stone, check the stone-care instructions, because they may tell you to remove it dry and stop washing it altogether.
Don’t reach for vinegar or a bathroom descaler to “see what happens”. Acid attacks cement grout and some natural stones, so the cleaner can take material away along with the deposit. If your floor is newly laid, ask the installer which grout, adhesive and finishing products they used, and whether there’s a recognised clean-up procedure for them.
If the white deposits come with damp patches, crumbling joints or loose tiles, get the floor assessed before your next deep clean. A tiler or damp specialist will be far more use to you than a bigger bottle of detergent.
Some Dullness Is Damage
Your tiles don’t have to be dirty to look tired. Grit scratches the finish, the wrong chemical can attack it, and years of feet wear it down. An old coating wears off along a walkway and stays intact under the furniture. Natural stone loses its polish too, through etching or plain old wear.
You’ll often notice these problems straight after mopping. That’s because water changes the way light reflects off the surface. While the floor is wet, a dull patch looks darker and more even. Then it dries, and the cloudy look comes right back. More detergent won’t change that.
Have a look and see whether the dullness follows a pattern. A narrow path from the kitchen door to the worktop points to foot traffic. Marks that match the sweep of an abrasive pad were probably caused by something mechanical. A pale, irregular patch on marble or limestone, right where something was spilled, may be etching, and that’s more likely if it feels different from the stone around it. None of this gives you a firm diagnosis. It does help you decide which professional to ring.
Can etched stone be rescued? Often, yes. Depending on its condition, a professional restorer may be able to refinish it. Cleaning won’t do it, though, because cleaning can’t reverse an acid reaction.
Glazed ceramic has its limits as well. If a glaze is permanently scratched or worn, no cleaning service should promise you the original finish back with a stronger detergent. Missing grout, loose tiles and failed sealant likewise need assessing and probably repairing. A surface stain will sometimes come off. Missing material won’t wash back into place.
Don’t try sanding, polishing compounds or a concentrated chemical as a home experiment. There’s a safer way to learn something. Give the area a gentle maintenance clean. If the floor around the dull patch improves and the patch itself stays exactly as it was, the material needs investigating, and scrubbing harder won’t help.
The Timing Of Your Clean Is Working Against You
Even a good method gives poor results when the floor is walked on before it’s dry. Feet through a damp entrance leave fresh prints. In a restaurant, staff carry kitchen dirt along a corridor that was washed a minute ago. A floor cleaned just before a delivery or the morning rush never gets a chance to look its best.
At home it’s less formal and just as familiar. The floor gets mopped, someone needs a cup of tea and the dog suddenly remembers an urgent appointment in the garden. Those footprints don’t mean the product failed. Floors get walked on, whatever the person holding the mop would prefer.
Where you can, clean in stages and leave a route so people can get past without crossing the wet part. Use as much water as the method needs and no more. Pick up the surplus as the procedure requires, and wait until the floor is completely dry before you judge it.
Commercial premises need firmer controls. Schedule wet cleaning for low-traffic periods and keep people off the wet areas until they are fully dry. You can use warning signs too, since slips are usually a risk here.
Drying time varies. It depends on the temperature, the ventilation, the texture of the floor and how much liquid was left on it. For a busy shop, cleaning last thing so the floor dries overnight may suit better than big wet cleans during trading hours. In another building, small cordoned-off sections might be the practical answer. Plan round the people who use the floor as well as the person cleaning it.
Troubleshooting Guide
| What You Notice | Likely Cause | Safe First Check | When To Stop Or Get Help |
|---|---|---|---|
| Thin streaks that follow the mop strokes | Residue, dirty water or uneven drying | Check tools and dilution, then rinse a small area with clean water | Streaks remain after a proper rinse, or the finish changes |
| Tacky tiles and footprints that come back fast | Detergent film or an old coating | Read the product directions and test-rinse a small patch | The surface stays slippery, or you can’t identify the coating |
| Dark grout between cleaner tiles | Dirt in recessed joints, staining or the grout’s own colour | Clean a small patch and compare it, fully dry, with the rest | Grout crumbles, cracks, stays wet or doesn’t respond |
| White powder along the joints | Efflorescence or another mineral or grout deposit | Look at the deposit dry and check for moisture that keeps returning | It comes back in the same place, or there’s damp |
| Dull or rough areas that don’t shift | Etching, scratches, wear or an unsuitable past treatment | Compare in dry light, with no scraping or harsh chemicals | The mark is unchanged and the surface looks damaged |
| Uneven damp patches | Trapped moisture, a leak or an installation fault | Note when and where the patch appears, and don’t flood it | Damp keeps returning, sealant fails or tiles loosen |
| Muddy smears near entrances | Grit not removed before mopping | Vacuum first, then try a clean pad on a small section | The texture holds dirt deeper than routine cleaning can safely reach |
When To Consider Professional Tile & Grout Cleaning
For routine upkeep, ordinary mopping is fine. You don’t need to ring a specialist every time someone tracks rain across the hall. There are a few situations, though, where professional tile and grout cleaning is the sensible next step.
The obvious one is embedded dirt that your routine cleaning hasn’t shifted. A deeply textured commercial floor, for example, can hold dirt across a large area that a household mop can’t reach or pick up. Cement grout with years of dirt in it is similar. It may need controlled agitation, with the dirty water collected afterwards. In both cases, an experienced cleaner should assess the surface and clean a test area before committing to a method.
So what are you paying for? The process. A proper assessment identifies your tile, your grout, any existing treatments and the likely deposits. The cleaner then picks products and equipment to suit, applies them correctly, removes what’s been loosened and checks the result once the floor is dry. If it’s a commercial site, the plan should also cover staff access, cordoning off, drying and reopening.
A good specialist will also tell you when cleaning is the wrong service altogether. If the stone is etched, you need a stone restorer. If the grout has fallen out, you need a tiler. And if moisture keeps getting in through a damaged floor, it’s a damp specialist you’re after. Far better to find that out from a test patch than after the whole floor has been treated for nothing.
The products matter here too. A few well-chosen cleaners with clear dilution and rinse instructions will do more for you than an impressive shelf of strong chemicals. When you ask for an assessment, put two questions to the provider. How do they deal with finishes they can’t identify? And is dirty-water recovery part of the job?
At home, your decision may come down to one stubborn patch in the kitchen or hall. If you run a hotel, office or shop, consistency and safe access across the whole site may matter more. Both are perfectly good reasons to get help, and you shouldn’t need a sales pitch to get it.
Day-To-Day Maintenance
Your deep clean will last a lot longer if your everyday routine stops putting dirt back on the floor.
Start at the door and keep the grit under control. Clean your mats and make sure they lie flat. Get the loose material up before you wash, and watch the edges where it collects. Use clean mop heads or pads, change dirty water and measure your cleaning solution. And wipe up a cooking spill while it’s still in one place, before it travels across the kitchen on people’s shoes.
Choose a maintenance product for the floor you actually have. The manufacturer’s guidance should tell you whether a neutral cleaner is right, whether it needs rinsing and which tools are safe to use. If you run a business with several tiled areas, one product and one pad may not suit them all. Your washroom, your reception floor and your back-of-house kitchen carry different dirt and can have different finishes, even if the cleaning checklist calls all three “tiles”.
A cleaning and maintenance programme matched to your flooring and how dirty it gets will serve you better than a promise to deep-clean on a fixed date. Heavy footfall calls for more frequent cleaning. A quiet room at home needs far less. Review how it’s going every so often, and look again if the surface starts to streak, lose grip or change in appearance.
If you manage a commercial team, keep the instructions where your staff can see them, train people in correct dosing and look after the equipment. Get those basics right and you should like what you see next time the tiles dry.
Related Floor Care Guides
All Guides →Tile & Grout Cleaning Services
Most natural and artificial stone floors start looking dirty and patchy because of the grout lines. The grout…
Steam Cleaning Vs Chemical Cleaning
Steam Cleaning Vs Chemical Cleaning For Tiles And Grout: Which Works Better? Stand in a busy café and…
Need Professional Help With Your Floors?
Call our Dublin team today or request a fast call back for expert floor deep cleaning, sealing, and diamond polishing.