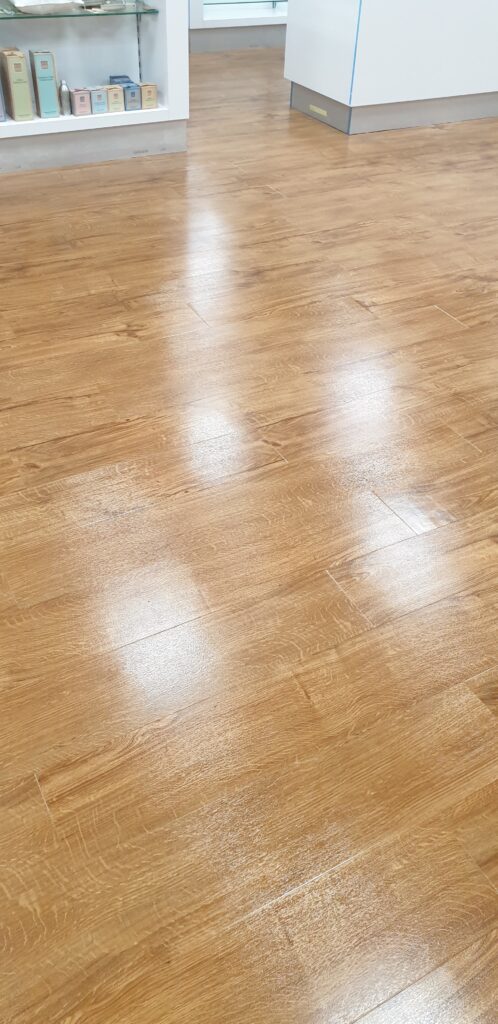
What Is The Marmoleum Floor
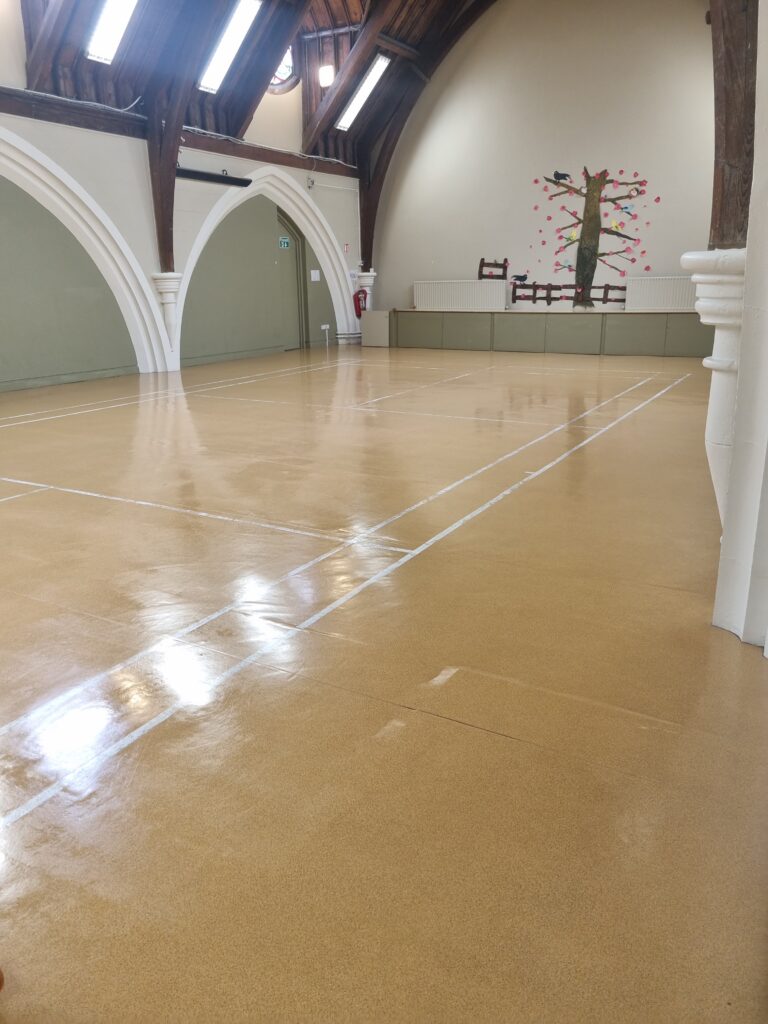
Clean, Seal And Polish Marmoleum Floors Like A Pro Marmoleum is a modern, eco-friendly floor covering designed as a durable alternative to traditional vinyl and lino floors. While it may look similar to linoleum, marmoleum is manufactured from natural and renewable raw materials such as linseed oil, wood flour, pine rosin, jute fibre, and natural pigments. Because of its organic composition, it is considered one of the most environmentally responsible floor types available. It has a low carbon footprint, is biodegradable, and contains none of the plasticisers or synthetic additives found in PVC-based flooring. Marmoleum floors are widely installed in schools, hospitals, nursing homes, dance studios, sports centres and public buildings, where hygiene, safety and sustainability are essential. The surface is slightly soft and warm underfoot, naturally anti-static, and contains antibacterial properties thanks to the oxidising linseed oil. Under normal residential use, marmoleum can remain perfectly intact for many years. However, in high-traffic areas—such as classrooms, corridors, gyms or commercial spaces—marmoleum floors experience high levels of friction, scraping, and soil embedding, which means they require periodic deep cleaning, sealing, and polishing to avoid permanent wear. Because marmoleum is porous when unsealed, it can easily absorb dirt, moisture, scuff marks and chemical stains. Therefore, regular marmoleum floor cleaning and scheduled marmoleum floor polishing are essential to maintain its appearance, hygiene, and lifespan. When treated professionally and maintained correctly, marmoleum floors can stay stain-free, glossy and protected for over a decade. Why Should You Polish The Marmoleum Marmoleum is not fully protected straight from installation. Unlike vinyl, it does not come with a built-in factory polymer coating. Once exposed to foot traffic, chairs, sports equipment or cleaning chemicals, unsealed marmoleum can dull quickly and suffer abrasion, patching and irreversible scratches. This is why all reputable floor cleaning companies, floor cleaning contractors, and floor cleaning services strongly recommend sealing and polishing marmoleum floors shortly after installation. Polishing marmoleum provides several important benefits: A fully polished marmoleum floor behaves like a protected surface rather than an absorbent one. Without this coating, the floor will deteriorate rapidly, especially in commercial buildings. If maintained properly, polishing only needs to be repeated every 1–3 years depending on footfall and cleaning routines. Marmoleum Floor Stripping Process Before marmoleum floor polishing can be carried out, any old sealers, floor polishes or embedded grime must be completely stripped off. Stripping is the most important step in the restoration cycle, and should only be carried out using professional floor stripping products, rotary floor buffers, and wet vacuum systems. A correct stripping process follows these principles: Correct marmoleum floor stripping produces a clean, residue-free, matte surface that is ready to accept new coats of sealer or primer. Failure to strip properly leads to visible streaks, patching, dull spots, and poor polish bonding. Important safety notes: Do not use ammonia-based, bleach-based, or acidic stripping solutions. Do not scrape the surface with blades. Do not scrub the floor with abrasive scourers. Improper stripping can permanently damage marmoleum. Marmoleum Floor Sealing Process Once the floor is fully stripped, rinsed and dried, the next step is marmoleum sealing. Sealing is what closes the microscopic pores of the floor and prepares it for polishing. Professional floor cleaners typically apply a primer or base sealer to level out small imperfections, restore colour uniformity and increase product adhesion. This base coat acts as a foundation layer that prevents the polish from soaking into the floor. After priming, the floor is sealed with two coats of high-traffic, water-based floor polish. The best and most widely recommended product for commercial marmoleum floors is Cleanfast Floor Polish 25%, a high-acrylic, durable finish designed for hospitals, schools, and retail buildings. It is easy to apply, dries quickly, and offers superior gloss retention and scuff resistance. Each coat should be applied with a clean microfiber mop applicator or polish pad, allowing full drying time between coats. Good ventilation and stable temperature are important for curing. Once both coats are dry, the floor is prepared for burnishing. Marmoleum Floor Polishing Polishing is the final stage in the restoration process and is responsible for creating the smooth, shiny, high-traffic protective finish that marmoleum floors are known for. The polishing stage involves buffing the sealed surface with a red or white pad using a high-speed burnisher. The heat generated during high-speed buffing melts the top surface of the floor polish slightly, allowing the coats to fuse together and harden into a single, durable layer. Polishing provides: Only red or white pads should be used. Black or green pads are too aggressive and will scratch and cut into the finish, leaving the floor patchy and dull. Once polished, the floor is ready for full use after a short curing period. Heavy furniture should not be dragged across the surface; instead, place protective pads under table and chair legs. How To Maintain Marmoleum Floors Proper marmoleum floor maintenance ensures the surface stays clean, shiny and damage-free for years. The maintenance routine depends on the environment, but the main rules are universal: Daily / Routine Cleaning Weekly Maintenance Periodic Maintenance What To Avoid If marmoleum becomes torn, deeply scratched, chemically burnt or stained beneath the sealer, polishing will not fix the damage. In those cases, replacement of the damaged section may be required. Best Marmoleum Floor Cleaner The best cleaner for ongoing marmoleum floor cleaning and marmoleum floor maintenance is always a PH-neutral floor detergent designed for sealed, polished floors. A good product removes dirt and grease without stripping polymers, dulling the surface, or reacting with the sealant. Professional floor cleaning companies typically use: Multi-surface cleaners, bleach, vinegar and heavy-duty degreasers should never be used on marmoleum as they weaken the finish and damage the surface. A local floor cleaning company in Dublin or any experienced floor cleaning contractor will always test the product PH before applying it to marmoleum.
How To Polish Concrete Floors
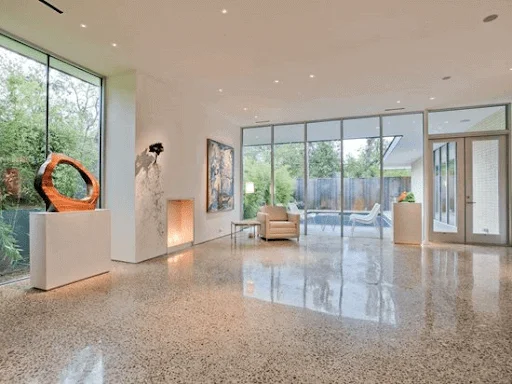
What Are The Concrete Floors The concrete floors can be found everywhere. Under pretty much any type of floor you can find a concrete base. This floor is usually very rough and very absorbent. Concrete is a composite material made from fine and coarse aggregate bonded together with a fluid cement that hardens over time. Its strength and durability make it an unparalleled foundation material. Despite its prevalence, in its raw, unsealed state, the concrete base is unsuitable for general-purpose flooring due to its porosity, which makes it highly susceptible to staining and dust generation. This raw state necessitates a full restoration and finishing process—a journey from a rough, porous base to a durable, aesthetically pleasing floor surface. The transformation involves a combination of mechanical grinding and chemical treatment to ready the material for daily use, making it a viable and stylish main floor. The ability to transform this humble, utilitarian material into a finished, elegant surface is a key reason for the surge in the popularity of concrete floor restoration and finishing techniques globally, including in places like floor cleaning Dublin. Concrete as a Finished Floor: Aesthetics and Durability The polished concrete floors can be found in many commercial and residential units. Unlike covering the concrete with carpeting, tiling, or wood, using the concrete itself as the finished floor offers a unique blend of industrial strength and modern design. The aesthetic appeal of polished concrete is substantial; the floors inspire elegance and class, often showcasing the natural aggregate within the concrete slab, which varies from one location to another. This natural variation ensures that no two polished concrete floors are exactly alike. Beyond aesthetics, the major benefit is durability. Once properly finished and sealed, a concrete floor provides an exceptionally long-lasting and low-maintenance surface that can withstand heavy foot traffic and wear, making it ideal for retail spaces, warehouses, and contemporary homes. This shift from subfloor to feature floor is central to understanding the modern demand for specialized concrete floor cleaning and concrete floor polishing services. Concrete Floor Polishing Technology Mechanical Grinding and Honing Process To be able to use it as the main floor, the surface must be grinded to a smooth finish. This smoothing is not a single-step operation but a progression of mechanical processes using increasingly finer abrasives. Heavy duty industrial grinder will be used to level up the floor, removing surface imperfections, old coatings, and the weakest layer of concrete known as the cement latitude. This initial grinding is aggressive, using metal-bonded diamond tools to achieve a flat surface. Subsequently, the process involves honing the floor with resin-bonded diamond pads, gradually moving through a series of grits, often starting as low as 40-grit and progressing up to 800-grit or higher. Each step in the grinding and honing process removes microscopic scratches left by the previous, coarser grit, which is the mechanism that generates the reflective quality of the polished floor. The result of this meticulous mechanical work is a dense, smooth surface that is intrinsically durable and ready for chemical refinement. The Role of Chemical Densifiers and Hardeners The next critical step in concrete floor polishing technology involves a chemical reaction to fundamentally alter the concrete’s composition near the surface. A number of solvent densifiers will be used to reduce the concrete softness and harden up the concrete. These densifiers are usually lithium, sodium, or potassium silicate-based solutions. When applied, the densifier penetrates the porous surface and reacts with the free lime and calcium hydroxide within the concrete to form a calcium silicate hydrate (CSH) compound. This compound is the same material that gives concrete its strength, but in this application, it fills the pores and voids, significantly increasing the surface density and hardness. This hardening process dramatically improves the floor’s resistance to abrasion and wear, and more importantly, it makes the concrete less absorbent, a vital prerequisite for preventing staining and simplifying future concrete floor cleaning tasks. This chemical hardening is what truly elevates the concrete from a basic slab to a highly durable, finished floor. Step By Step Concrete Polishing Pre-Grinding Preparation and Repair The complete concrete floor restoration process begins long before the first grinder is turned on. The floor must first be thoroughly inspected for cracks, spalls, and pitting. All existing coatings, adhesives, or sealers must be fully removed. Any defects must be repaired using semi-rigid epoxy or polyurea repair products that are matched as closely as possible to the colour of the concrete. This preparatory phase is crucial because polishing will highlight any remaining imperfections. The work area must also be properly masked and contained to protect adjacent surfaces and control dust, even with modern wet or vacuum-assisted grinding techniques. The success of the final polished look depends directly on the thoroughness of this preparation and repair stage. The Grinding and Densification Cycle The core of the process involves the progressive grinding and the application of the densifier. The grinding steps (as outlined above, moving from coarse metal-bonded to fine resin-bonded diamond tools) must be executed sequentially, with each pass overlapping to ensure uniformity. Typically, the densifier is applied after an intermediate grinding step (e.g., after the 80-grit or 150-grit stage). The impregnated densifier is allowed to fully cure, which can take several hours, before grinding resumes. This timing ensures the newly hardened surface is fully integrated before the final polishing passes. The heavy duty industrial grinder is key to ensuring an even and level finish, setting the stage for the final aesthetic. Final Polishing and Glazing The final steps of concrete floor polishing involve using the finest resin-bonded diamond pads (e.g., 400-grit, 800-grit, 1500-grit, or even 3000-grit) to achieve the desired level of gloss. The final coating will slightly glaze the surface with a matt or a semi gloss finish. This final coating is usually a stain-guard or an impregnating sealer that is applied after the polishing is complete. This protective layer is not a film that sits on top but a chemical barrier that penetrates the surface
Marble Floor Cleaning And Polishing
What Is A Marble Floor Marble, a timeless and luxurious material, has been a cornerstone of architecture and design for millennia, gracing everything from ancient monuments to modern high-end homes and commercial spaces. A marble floor is an exquisite natural stone flooring option renowned for its unique veining, rich color variations, and innate ability to bring sophistication to any interior. What exactly is this stone and how is it produced? Scientifically, marble is a metamorphic rock, meaning it was once another type of rock—typically limestone—that has been subjected to intense heat and pressure deep within the Earth’s crust over millions of years. This process, known as metamorphism, causes the original carbonate minerals (primarily calcite, and sometimes dolomite) to recrystallize, resulting in the interlocking, granular texture that defines true marble. The distinct patterns, or veins, are created by various mineral impurities like clay, silt, sand, iron oxides, or chert, which were present in the original limestone. The color of the marble is largely determined by the primary mineral composition, with pure, highly refined calcite marble being brilliant white, while impurities introduce shades of black, grey, pink, green, yellow, and red. The production of marble flooring is a multi-step, labor-intensive process that begins in quarries located around the world, from Italy and Greece to Brazil and China. Massive blocks of stone are extracted using specialized cutting equipment, minimizing fracturing. These raw blocks are then transported to processing plants where they are cut into slabs using multi-wire saws or gang saws. Once cut, the slabs are typically treated with an epoxy or resin to fill any natural fissures and enhance the structural integrity. Finally, the surface is subjected to a series of mechanical abrasion and polishing steps to achieve the desired finish, ranging from a matte honed look to the brilliant, mirror-like polished finish that is most sought after for flooring. The installation of a marble floor transforms a space, but it is crucial to understand that while a marble floor can look amazingly natural, a marble floor that is not polished or sealed is likely to absorb a lot of dirt and to stain very easily, demanding a commitment to proper long-term marble floor cleaning and maintenance to preserve its aesthetic appeal. Types Of Marble Floors The world of marble is vast and varied, with thousands of different types quarried globally, each possessing a unique blend of color, veining, and mineral composition. Understanding these types is essential for appreciating their maintenance needs. Broadly, marbles can be categorized by their origin and appearance, with certain types achieving global popularity due to their distinct elegance and durability. The Most Popular Marble Varieties Classification by Finish The type of finish dramatically impacts a marble floor’s look and maintenance requirements. What Is Marble Polishing Marble floor polishing is a crucial maintenance and restoration process designed to enhance and protect the natural beauty of the stone floor, specifically by imparting a high-gloss, reflective shine. Over time, all marble floors, especially in high-traffic commercial and residential areas, begin to suffer from wear and tear. This includes dull patches caused by foot traffic, microscopic scratches from dirt and grit, acid etching from spills (like citrus or vinegar), and general loss of luster. Simply mopping the floor, even with the best floor cleaning dublin services, will not be enough to resolve these surface defects. Polishing is fundamentally about smoothing the stone’s surface to the point where light reflects uniformly, creating the characteristic mirror-like finish. This process is distinct from mere cleaning; it is a form of light restoration. It involves using progressively finer abrasive materials and/or chemical compounds to smooth the microscopic peaks and valleys that develop on the surface. When the surface is perfectly smooth, the pores are tightened, which not only increases the shine but also makes the stone less susceptible to immediate dirt absorption and staining. A well-polished floor is easier to clean and maintain on a daily basis. The goal of professional natural stone polishing is twofold: first, to mechanically or chemically restore the original factory finish or achieve a new, desired level of gloss; and second, to prepare the stone for effective sealing. The gloss on a marble floor can be achieved with a marble floor polishing powder, a sealer, an impregnator, some type of floor polish or by buffing the surface with a high speed floor burnisher and a diamond pad. While marble floor polishing can be attempted by DIY users, it is highly recommended to use a fully insured and highly regarded marble floor cleaning contractor to ensure the correct techniques and products are used, preventing irreversible damage to this expensive natural material. Best Marble Polishing Technologies Achieving a high-quality, durable, and deep gloss on a marble floor requires a combination of skilled technique and advanced technology. The most efficient marble floor cleaning technologies and polishing systems can vary slightly from country to country, but the fundamental mechanical and chemical principles remain consistent globally. Modern polishing is primarily carried out through two main technological approaches: mechanical abrasion (grinding and honing) and chemical crystallization (powder or compound polishing). Mechanical Abrasion and Grinding This is the most effective and aggressive method, used to remove deeper scratches, stubborn stains, and significant lippage (uneven tile edges) before polishing. To remove scratches and dull patches from any marble floor, the user has to use either diamond impregnated pads or special steel plates that grind the floor slowly. Chemical Polishing and Crystallization Once the mechanical grinding has achieved a smooth surface, chemical processes are used to lock in the final, brilliant shine. How To Polish Marble Floors The process of marble floor polishing is a systematic restoration that moves from deep cleaning and repair to final sealing and gloss achievement. It’s an involved, multi-stage operation best performed by trained professionals. Deep Cleaning and Preparation The first step is a thorough deep clean. The floor must be entirely stripped of old waxes, sealers, and surface dirt. This is achieved using a professional, alkaline stone cleaner and a low-speed scrubbing
Oiled Floor Maintenance
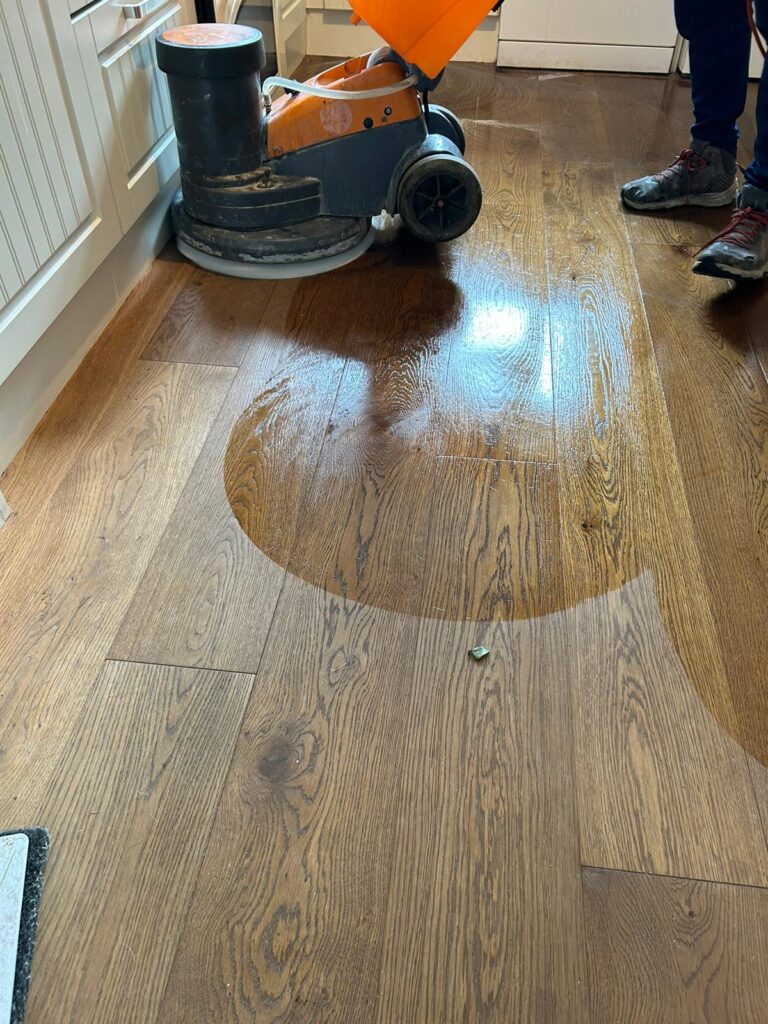
The Natural Beauty Of Oiled Floors Oiled floors possess a unique and timeless charm that resonates with a connection to nature. Unlike other floor finishes, the floor oils are likely to preserve the natural look of the wood without creating an artificial coating. This is a significant advantage for those who appreciate the inherent beauty and texture of natural timber. The oil penetrates deep into the wood fibers, nourishing and protecting them from within. Most floor oils are being nearly fully absorbed by the wood, leaving a matte or satin finish that feels natural underfoot. The floor’s texture, the grain and the very fiber of the wood, can still be distinctly felt when touched, providing a tactile experience that a surface coating cannot replicate. This natural finish is also highly appreciated for its ability to allow the wood to breathe. The natural ventilation afforded by the oil helps regulate moisture within the wood, which is beneficial for the floor’s longevity. Furthermore, a key consideration for many environmentally conscious consumers is the chemical composition of the finish. Generally, floor oils usually contain less harmful chemicals than the solvent-based floor lacquers, making them a more appealing, ‘greener’ option for interior spaces. The aesthetic appeal of an oiled floor is one of warmth, depth, and character, making it a highly desirable choice for both modern and traditional homes. The soft sheen and the way the wood ages gracefully over time, acquiring a beautiful patina, only add to its enduring appeal. The Difference Between The Oils And Lacquers Understanding the fundamental difference between oils and lacquers is crucial for effective floor maintenance. The primary distinction lies in how they interact with the wood. Floor oils are penetrating finishes; they sink into the wood to protect it from the inside out. They bind with the wood fibers and harden within the material, creating a robust, yet completely natural-looking barrier against dirt and moisture. They enhance the wood’s natural color and grain without masking it. In contrast, most floor lacquers are surface finishes. They are likely to over glaze the surface and create an artificial coating over the top of the wood. This coating acts as a seal, completely covering the wood. While lacquers offer very high resistance to wear and tear and are generally easier to clean, they create a plastic-like layer that can look somewhat artificial. This surface layer also prevents the natural ventilation of the wood. When a lacquer is damaged or scratched, the entire surface may need to be sanded down and recoated to restore its uniform look. For an oiled floor, a localized repair is often possible, simply by spot-cleaning and reapplying oil to the damaged area, making maintenance less disruptive in the long run. The choice between oil and lacquer often comes down to a preference for a natural, repairable finish (oil) versus a highly durable, low-maintenance surface coating (lacquer). Hardwaxoil Versus Floor Oils Within the category of oil finishes, there are two major types to consider: floor oils and hardwax oils. While both penetrate the wood, their final appearance and performance characteristics differ. The standard floor oils are fully absorbed by the wood, leaving a very natural, open-pore finish. They are typically manufactured from natural components, such as olive oil, often combined with some enhancers to improve durability and drying time. This type of oil profoundly showcases the wood’s natural texture and feel. There are clear oils that do not change the look and the colour of the wood at all, maintaining the original pale shade, and there are floor oils that contain a tint, which can be used to deepen the color or alter the hue of the wood. The goal of traditional floor oils is purely to nourish and protect the wood without creating a noticeable surface layer. Hardwax oils, on the other hand, are designed to imitate the look of the lacquers while retaining some of the natural feel of an oiled floor. They are a blend of natural oils and waxes. The oil component penetrates and nourishes the wood, while the wax component remains on the surface, forming a thin, protective, and slightly harder layer. This wax layer provides enhanced resistance to water and spills compared to traditional oils and often results in a finish that has a slightly more noticeable sheen, falling somewhere between the matte look of a traditional oil and the high gloss of a lacquer. This provides an excellent compromise for those who desire the durability and easier cleaning of a surface layer but still want a finish that allows the wood to breathe and can be repaired locally. How To Refresh Oiled Floors Refreshing an oiled floor is a necessary maintenance process that restores its protective qualities and aesthetic appeal. Over time, high-traffic areas will show signs of wear as the oil is slowly depleted. The entire refreshing process is a multi-step operation that ensures the floor is properly prepared and treated for maximum longevity. Deep Cleaning Preparation Before any oil is reapplied, the floor must be meticulously cleaned. The floor should be deep cleaned with a quality oiled floor cleaning product to remove as much dirt, grime, and old, soiled oil as possible. The presence of dirt will inhibit the penetration of the new refresher coat and lead to an uneven, dirty appearance. This deep cleaning is best achieved with a flat mop, utilizing a controlled amount of water. Excessive water should be avoided at all costs, as wood is highly susceptible to water damage. The cleaning agent must be specifically formulated for oiled floors, as harsh household cleaners can strip the remaining oil and damage the wood. Once cleaned, the floor must be allowed to dry completely. A clean, matte surface is the ideal foundation for the refresher oil. Application of the Refresher Oil Once the floor is bone dry and clean, the refreshing oil can be applied. A thin coat of oiled floor refresher should be applied evenly all over the floor. The key to success
Amtico Floor Cleaning And Maintenance
The Elegance Of Amtico Floors Amtico floors are renowned for their exceptional blend of durability and aesthetic appeal. They offer a unique solution for both residential and commercial spaces, providing the look and feel of natural materials like wood, stone, or ceramic tiles without the associated maintenance challenges. The ability to mimic a vast range of textures and patterns makes Amtico a highly versatile flooring choice, allowing for creative and personalized designs. The elegance of these floors lies in their seamless finish and the quality of the realistic designs, which can elevate the look of any room. Their resilience to daily wear and tear ensures they maintain their sophisticated appearance for years, making them a wise and stylish investment. What Are The Amtico Floors Amtico floors are a type of high-quality luxury vinyl tile (LVT). They are a synthetic flooring material made primarily from a composition of polyvinyl chloride (PVC) resins and plasticizers. This unique combination gives the floors their incredible strength, flexibility, and resistance to water. Unlike natural materials, Amtico floors are non-porous and do not absorb spills, making them an excellent choice for kitchens, bathrooms, and other high-moisture areas. The innovative manufacturing process allows for the creation of intricate designs that replicate the appearance of hundreds of different natural floors, from rich oak and rustic pine to elegant marble and contemporary concrete. This versatility, combined with their practical benefits, is what sets Amtico floors apart in the world of flooring. The Amtico brand was founded in the UK and has been a leader in the LVT market for decades. The floors were invented as a response to the need for a durable, low-maintenance, and stylish alternative to traditional flooring materials. The creators of Amtico recognized that people wanted the beauty of natural floors without the vulnerability to moisture, scratches, and stains. They developed a multi-layered product that could be customized in endless ways, providing architects, designers, and homeowners with unparalleled creative freedom. The floors’ popularity is a direct result of their ability to combine stunning visuals with exceptional performance. They are not just a floor covering; they are a design element that can be tailored to any taste and lifestyle. Types Of Amtico Floors Amtico offers several product ranges to suit different needs and applications. The core ranges include: Each range provides a unique set of benefits, but all Amtico floors share the same core qualities of durability, water resistance, and stunning design. Why Should You Seal Your Amtico Floors? While Amtico floors are sold with a factory-applied protective layer, intense daily use can gradually wear this finish down. Sealing your Amtico floor with a high-quality polish or dressing provides an additional layer of protection, which is crucial for maintaining its appearance and longevity, especially in high-traffic areas like commercial spaces or busy family homes. Sealing, also known as dressing or polishing, offers several key benefits: For Amtico floors, you should use either the brand’s own product, Amtico Dressing, or a high-quality, professional-grade alternative like Cleanfast Floor Polish 25% Floor Polish. These products are specifically designed to work with LVT and provide a durable, long-lasting finish. Amtico Floor Stripping Before applying a new coat of polish or dressing, it is absolutely essential to strip the floor of all pre-existing finishes. This step is critical for a successful and long-lasting polish application. If you apply new polish over an old, dirty, or damaged layer, it will not adhere properly, resulting in a patchy, uneven, and unprofessional finish. The stripping process involves using a professional-grade floor stripper, such as Amtico Stripper. Here is a general guide to the stripping process: Amtico Floor Polishing Once the floor is stripped and dry, it is ready for polishing. This is the final step in restoring the floor’s shine and providing a protective layer. Amtico Floor Maintenance Proper daily and weekly maintenance is key to keeping your Amtico floor looking its best and extending the life of your polish. How To Protect The Sealer The newly applied sealer, or polish, is the floor’s main line of defense, and it needs to be protected to ensure it lasts as long as possible. FAQ By following these detailed instructions on stripping, polishing, and daily maintenance, you can ensure your Amtico floors remain a beautiful and durable feature of your home or business for many years to come. your home or business for many years to come.
Travertine Floor Maintenance
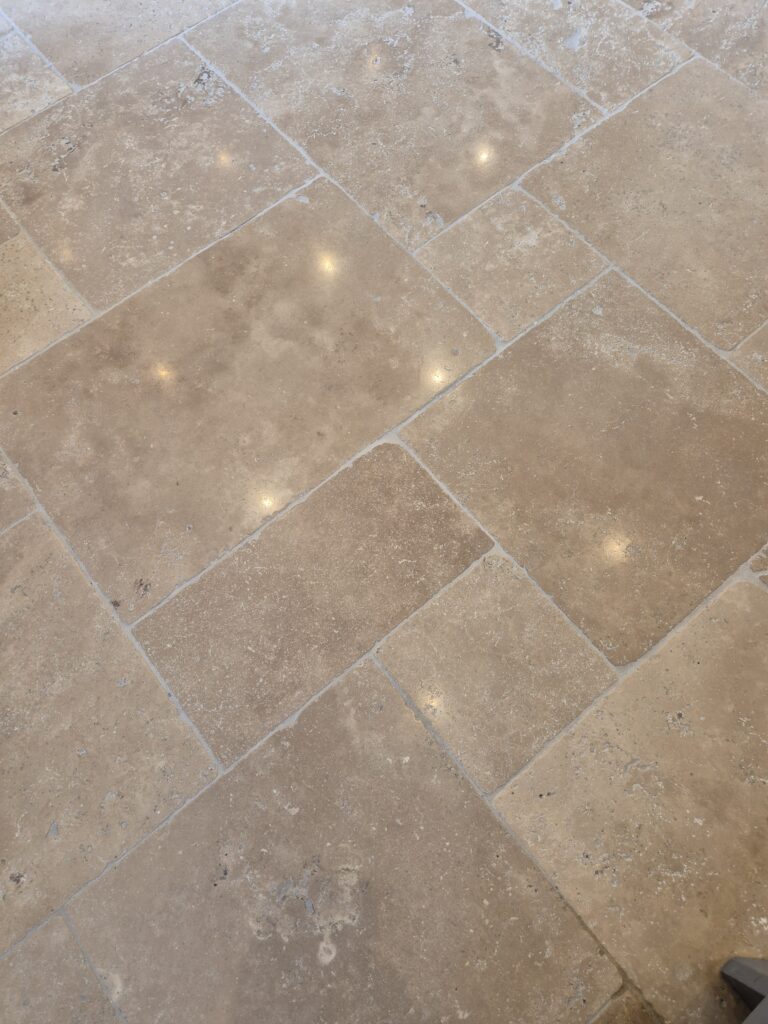
What Is A Travertine Floor? Travertine is a form of limestone that is created by mineral deposits from natural hot springs. This sedimentary rock is known for its distinctive porous appearance, which results from trapped gases and organic matter during its formation. Travertine has been used for building and decoration for thousands of years, most famously in the construction of the Roman Colosseum. Its unique beauty, durability, and versatility have made it a popular choice for flooring in both residential and commercial spaces. Travertine floors offer a blend of rustic charm and timeless elegance. The natural stone comes in a wide range of colors, from soft ivories and creamy beiges to rich browns and subtle golds, depending on the minerals present during its formation. The surface can be finished in various ways, including tumbled, honed, brushed, or polished, each offering a distinct aesthetic and texture. However, the defining characteristic of travertine is its natural porosity. These tiny holes, or pores, are a direct result of the gas bubbles that were trapped within the stone as it formed. The size and frequency of these pores vary significantly between different types of travertine, which directly impacts its suitability for specific applications. Travertine is a medium-to-high absorbency floor, which means it can easily soak up liquids. This characteristic makes it vulnerable to staining and dirt penetration if not properly sealed and maintained. Understanding the nature of your specific travertine floor is the first and most crucial step in its proper care. Best Travertine Tiles The term “best” when it comes to travertine tiles is subjective and depends entirely on the intended use and location. There are numerous types of travertine tiles, each with its own set of characteristics related to origin, size, and porosity. Differences in Travertine Tiles: Origin, Size, and Porosity Origin: Travertine is quarried all over the world, with major deposits found in Italy, Turkey, Mexico, and Iran. The location of the quarry often influences the color, veining, and overall quality of the stone. For example, Italian travertine, such as the famous Roman Travertine, is highly prized for its classic elegance, while Turkish travertine is known for its creamy, light colors. Size: Travertine tiles are available in a wide variety of sizes, from small mosaics to large format slabs. The size choice often depends on the design aesthetic and the scale of the room. Porosity: This is perhaps the most critical factor to consider. Travertine tiles can have small holes or large pores. Choosing the Right Travertine for Your Space All travertine floors are beautiful, but for different reasons. For a busy commercial space, a low-porosity, high-density travertine is the “best” choice due to its resilience and ease of maintenance. For a cozy, low-traffic residential area, a high-porosity, tumbled travertine might be the “best” choice for its rustic, natural aesthetic. The key is to match the tile’s characteristics with the demands of the environment where it will be installed. How To Seal Travertine Floors Sealing is a non-negotiable step for any travertine floor, regardless of its porosity. This process involves applying a protective impregnator that penetrates the stone’s surface to create a barrier against spills, dirt, and stains. Sealing is a proactive measure that drastically reduces the need for aggressive cleaning and prevents permanent damage. The Sealing Process Travertine Floor Impregnators Impregnators are the best type of sealant for travertine. Unlike topical sealers that form a layer on top of the stone, impregnators penetrate deep into the pores, creating a protective barrier from within. This allows the stone to “breathe” while effectively repelling liquids. Faber is a well-known manufacturer of effective and natural travertine floor impregnators. You can choose a natural, semi-gloss, or glossy impregnator to increase or decrease the sheen level of your floor. This allows you to not only protect the stone but also to enhance its aesthetic appeal. How To Polish Travertine Floors Polishing is the process of enhancing the natural shine of a travertine floor. Over time, even a sealed and well-maintained floor can lose its luster due to foot traffic, micro-scratches, and general wear and tear. Polishing can restore a dull, tired-looking floor to its former glory. Professional Travertine Floor Polishing While it’s possible to do some polishing yourself, it is highly recommended to hire a professional travertine floor polishing company for a truly effective and safe restoration. Professional polishers have the right tools and expertise to handle the complexities of different travertine types. DIY Travertine Floor Polishing For a basic DIY polishing project, you can use a polishing powder or a cream designed for natural stone. Important Note: DIY polishing can be risky. Using the wrong products or techniques can lead to etching, swirling, or permanent damage to the stone. Always test the product in an inconspicuous area first. Diamond Pad Polishing Diamond pad polishing is one of the most effective methods for restoring dull or scratched travertine floors. This system involves a series of diamond-impregnated pads, each with a different grit level. Diafil Discolux Diamond Polishing Pads are known for their effectiveness in restoring travertine floors. A system of four pads can significantly enhance the sheen of a tired floor. How To Maintain Travertine Floors Daily maintenance is the key to preserving the beauty and longevity of your travertine floors. Proper maintenance routines prevent dirt from building up and reduce the need for aggressive cleaning and polishing. Daily Cleaning Spills and Spot Cleaning How To Protect Polished Travertine Floors Once your travertine floor has been polished, it’s crucial to take extra steps to protect its new shine. Best Travertine Floor Cleaners Choosing the right cleaner is paramount for the long-term health of your travertine floor. The best cleaners are those that are gentle, effective, and do not compromise the integrity of the stone or its sealer. Why PH-Neutral Cleaners? The PH scale measures the acidity or alkalinity of a substance. A PH of 7 is neutral. Natural stones like travertine are sensitive to both highly acidic (low PH) and highly alkaline (high PH)
Innovative Floor Cleaning Technologies

Revolutionizing Floor Care: Innovative Cleaning Technologies and the Advantages of Water-Based Floor Sealers The humble floor, often overlooked, endures relentless abuse from foot traffic, spills, and the constant barrage of dust and grime. Maintaining clean, well-maintained floors is paramount not only for aesthetics but also for hygiene, safety, and the longevity of the flooring material itself. This comprehensive article explores the cutting-edge technologies transforming floor cleaning practices, while also delving into the advantages of water-based floor sealers, a crucial component in preserving and enhancing various floor types. Part 1: The Dawn of Intelligent Cleaning Technologies Traditional floor cleaning methods, often reliant on manual labor and conventional tools, are steadily being replaced by sophisticated technologies that optimize efficiency, improve cleaning outcomes, and minimize environmental impact. Here’s an in-depth look at the key advancements shaping the future of floor care: 1.1. Robotic Floor Cleaners: The Autonomous Revolution Autonomous cleaning robots are revolutionizing both commercial and residential spaces, offering a hands-free approach to floor maintenance. Equipped with an array of sensors, advanced navigation systems, and intelligent mapping capabilities, these robots can autonomously navigate complex environments, avoid obstacles, and systematically clean large areas with minimal human intervention. The key advantages they offer include: 1.2. Advanced Cleaning Solutions: A Chemical Revolution The development of eco-friendly and highly effective cleaning solutions is another pivotal advancement in floor care. These solutions are meticulously formulated to target specific types of dirt, grime, and stains while minimizing environmental impact and promoting sustainability. Key innovations in this realm include: 1.3. Internet of Things (IoT) Integration: Connecting the Cleaning Ecosystem The integration of Internet of Things (IoT) technology is ushering in a new era of intelligent and connected floor cleaning systems. IoT-enabled cleaning equipment allows for remote monitoring, data analysis, and automated maintenance scheduling, optimizing cleaning operations and enhancing efficiency. Key benefits of this integration include: 1.4. UV-C Disinfection Technology: Elevating Hygiene Standards Ultraviolet-C (UV-C) light technology is gaining prominence in floor cleaning, particularly in healthcare facilities, schools, and other hygiene-critical environments. UV-C light has germicidal properties, effectively killing bacteria, viruses, and other microorganisms on floor surfaces. Key advantages include: Part 2: The Advantages of Water-Based Floor Sealers: A Protective Embrace Floor sealers play a crucial role in protecting and enhancing the beauty of various flooring materials. While solvent-based sealers were once the norm, water-based sealers have emerged as a superior alternative, offering a host of advantages that benefit both the environment and the health of those who occupy the space. 2.1. Environmental Friendliness: Water-based sealers are formulated with low VOCs (volatile organic compounds), minimizing the release of harmful chemicals into the environment. This makes them a more sustainable choice compared to solvent-based sealers, which can release significant amounts of VOCs, contributing to air pollution and potential health hazards. 2.2. Improved Indoor Air Quality: The low VOC content of water-based sealers translates to improved indoor air quality. This is particularly important in homes, schools, and healthcare facilities where occupants may be sensitive to chemical fumes. Water-based sealers create a healthier indoor environment, minimizing the risk of respiratory irritation and other health issues associated with VOC exposure. 2.3. Ease of Application: Water-based sealers are generally easier to apply compared to solvent-based sealers. They have a thinner consistency, spread more easily, and dry faster, reducing application time and minimizing disruptions. Cleanup is also simpler, requiring only soap and water. 2.4. Durability and Longevity: Modern water-based sealers offer excellent durability and longevity, providing long-lasting protection for various floor types. They resist scuffs, scratches, and stains, helping to maintain the floor’s appearance and extend its lifespan. Advances in formulation have made water-based sealers comparable to, and in some cases even surpassing, the performance of solvent-based sealers. 2.5. Versatility: Water-based sealers are available in a wide range of finishes, from high-gloss to matte, allowing you to achieve the desired aesthetic for your flooring. They are also suitable for various floor types, including hardwood, concrete, natural stone, and even some vinyl and linoleum floors. 2.6. Cost-Effectiveness: While the initial cost of water-based sealers may be slightly higher than solvent-based options, their long-term cost-effectiveness is undeniable. Their durability and ease of maintenance reduce the need for frequent reapplication, saving you money and time in the long run. Part 3: Floor Sealers and Specific Flooring Types: A Tailored Approach Different flooring materials have unique characteristics and require specific types of sealers to achieve optimal protection and enhance their natural beauty. Here’s a closer look at how water-based sealers benefit various floor types: 3.1. Hardwood Floors: Water-based sealers are an excellent choice for hardwood floors, offering a protective layer that enhances the wood’s natural grain and color while safeguarding it from moisture damage, scratches, and stains. They allow the wood to “breathe,” preventing moisture buildup that can lead to warping or cracking. 3.2. Concrete Floors: Water-based sealers are becoming increasingly popular for concrete floors, particularly in residential and commercial settings where aesthetics and indoor air quality are paramount. They penetrate the concrete surface, providing a durable, stain-resistant finish that enhances its appearance and protects it from wear and tear. 3.3. Natural Stone Floors: Natural stone floors, such as marble, granite, and limestone, are porous and susceptible to staining. Water-based sealers create a protective barrier that prevents liquids from penetrating the stone, preserving its natural beauty and preventing discoloration. 3.4. Resilient Floors: While not all resilient floors require sealing, some types, such as luxury vinyl tile (LVT), can benefit from a water-based sealer to enhance their shine and protect them from scuffs and scratches. Part 4: The Synergy of Technology and Sealers: A Holistic Approach to Floor Care Innovative cleaning technologies and high-quality floor sealers work synergistically to create a comprehensive floor care strategy. Robotic cleaners, advanced cleaning solutions, and IoT integration optimize cleaning efficiency and effectiveness, while water-based sealers provide a protective layer that enhances the floor’s beauty and longevity. 4.1. Optimizing Cleaning and Maintenance: Sealed floors are generally easier to clean and maintain. The protective layer
Floor Cleaning Dublin | How To Clean All Types Of Floors

Floor Cleaning Dublin | How To Clean All Types Of Floors From time to time we will all be faced with some kind of floor cleaning project. The floors that used to be very glossy are now very matt and the floors that used to be matt are now very glossy. The grout lines are also very dirty and in some cases the floors can change colour due to high porosity and high absorbency. From here onwards you will need to decide if you have the finances to use the services of a professional floor cleaning company or if you are brave enough to do the work yourself. The point of this article is to give you the basic information about how to do it safely and what tools you might need to achieve decent results without permanently damaging the floor. Your idea might be right but by not knowing what to use on what surface, an accident can easily happen and instead of deep cleaning the floor you might end up burning the floor. Read this article as a guide not as a step by step information. Firstly, let’s find out what type of floor cleaning techniques can be done and what kinds of tools are required. The above three steps are the most basic steps used in the floor cleaning industry. Many other operations can be done to fully restore and polish all types of floors, but these three steps are the most essential in the process of floor cleaning and floor restoration. Below, we will detail the steps needed to deep clean most types of popular floors: Floor Cleaning Dublin | How To Clean All Types Of Floors