Marble Floor Cleaning And Polishing
What Is A Marble Floor
Marble, a timeless and luxurious material, has been a cornerstone of architecture and design for millennia, gracing everything from ancient monuments to modern high-end homes and commercial spaces. A marble floor is an exquisite natural stone flooring option renowned for its unique veining, rich color variations, and innate ability to bring sophistication to any interior. What exactly is this stone and how is it produced? Scientifically, marble is a metamorphic rock, meaning it was once another type of rock—typically limestone—that has been subjected to intense heat and pressure deep within the Earth’s crust over millions of years. This process, known as metamorphism, causes the original carbonate minerals (primarily calcite, and sometimes dolomite) to recrystallize, resulting in the interlocking, granular texture that defines true marble. The distinct patterns, or veins, are created by various mineral impurities like clay, silt, sand, iron oxides, or chert, which were present in the original limestone. The color of the marble is largely determined by the primary mineral composition, with pure, highly refined calcite marble being brilliant white, while impurities introduce shades of black, grey, pink, green, yellow, and red.
The production of marble flooring is a multi-step, labor-intensive process that begins in quarries located around the world, from Italy and Greece to Brazil and China. Massive blocks of stone are extracted using specialized cutting equipment, minimizing fracturing. These raw blocks are then transported to processing plants where they are cut into slabs using multi-wire saws or gang saws. Once cut, the slabs are typically treated with an epoxy or resin to fill any natural fissures and enhance the structural integrity. Finally, the surface is subjected to a series of mechanical abrasion and polishing steps to achieve the desired finish, ranging from a matte honed look to the brilliant, mirror-like polished finish that is most sought after for flooring. The installation of a marble floor transforms a space, but it is crucial to understand that while a marble floor can look amazingly natural, a marble floor that is not polished or sealed is likely to absorb a lot of dirt and to stain very easily, demanding a commitment to proper long-term marble floor cleaning and maintenance to preserve its aesthetic appeal.
Types Of Marble Floors
The world of marble is vast and varied, with thousands of different types quarried globally, each possessing a unique blend of color, veining, and mineral composition. Understanding these types is essential for appreciating their maintenance needs. Broadly, marbles can be categorized by their origin and appearance, with certain types achieving global popularity due to their distinct elegance and durability.
The Most Popular Marble Varieties
- Carrara Marble (Italian): Perhaps the most famous marble in the world, Carrara is characterized by a soft white to light grey background with subtle, feathery grey veining. It is highly versatile and frequently used in both classic and contemporary settings. While relatively softer than some other marbles, its prevalence makes it a globally recognized standard for sophisticated flooring.
- Calacatta Marble (Italian): Often confused with Carrara, Calacatta is rarer and more premium. It features a dramatically whiter background with thicker, more distinct veining that can range from grey to gold or even brown. Its striking contrast makes it a popular choice for statement floors.
- Statuario Marble (Italian): Falling between Carrara and Calacatta, Statuario has a bright white field and medium to thick, bold grey veining. It is prized for its clarity and used extensively in high-end projects.
- Crema Marfil (Spanish): Known for its warm, creamy beige color and soft, irregular veining, Crema Marfil is one of the most popular beige marbles globally. Its neutral tone makes it an excellent choice for large floor areas, adding warmth without being overly dominant.
- Nero Marquina (Spanish): A stunning black marble with bright white veining, Nero Marquina offers a dramatic, high-contrast look, often used as an accent or in smaller, high-impact areas.
Classification by Finish
The type of finish dramatically impacts a marble floor’s look and maintenance requirements.
- Polished Finish: This is the most common and recognizable finish, achieved through extensive mechanical grinding and buffing. It results in a high-gloss, mirror-like shine that reflects light beautifully. While stunning, this finish is the most susceptible to etching (acid damage) and scratches, and requires regular marble floor polishing to maintain its luster.
- Honed Finish: A honed floor is smooth but has a low-sheen, satin, or matte appearance. This finish is less likely to show scratches and is often preferred in high-traffic areas or for a more subdued, contemporary look. It still requires marble floor sealing to prevent deep stains.
- Tumbled or Brushed Finish: These finishes create a textured, aged, or distressed appearance, often used to mimic antique stone. They are the least demanding in terms of surface scratch visibility but still need effective marble flor sealing against staining.
What Is Marble Polishing
Marble floor polishing is a crucial maintenance and restoration process designed to enhance and protect the natural beauty of the stone floor, specifically by imparting a high-gloss, reflective shine. Over time, all marble floors, especially in high-traffic commercial and residential areas, begin to suffer from wear and tear. This includes dull patches caused by foot traffic, microscopic scratches from dirt and grit, acid etching from spills (like citrus or vinegar), and general loss of luster. Simply mopping the floor, even with the best floor cleaning dublin services, will not be enough to resolve these surface defects.
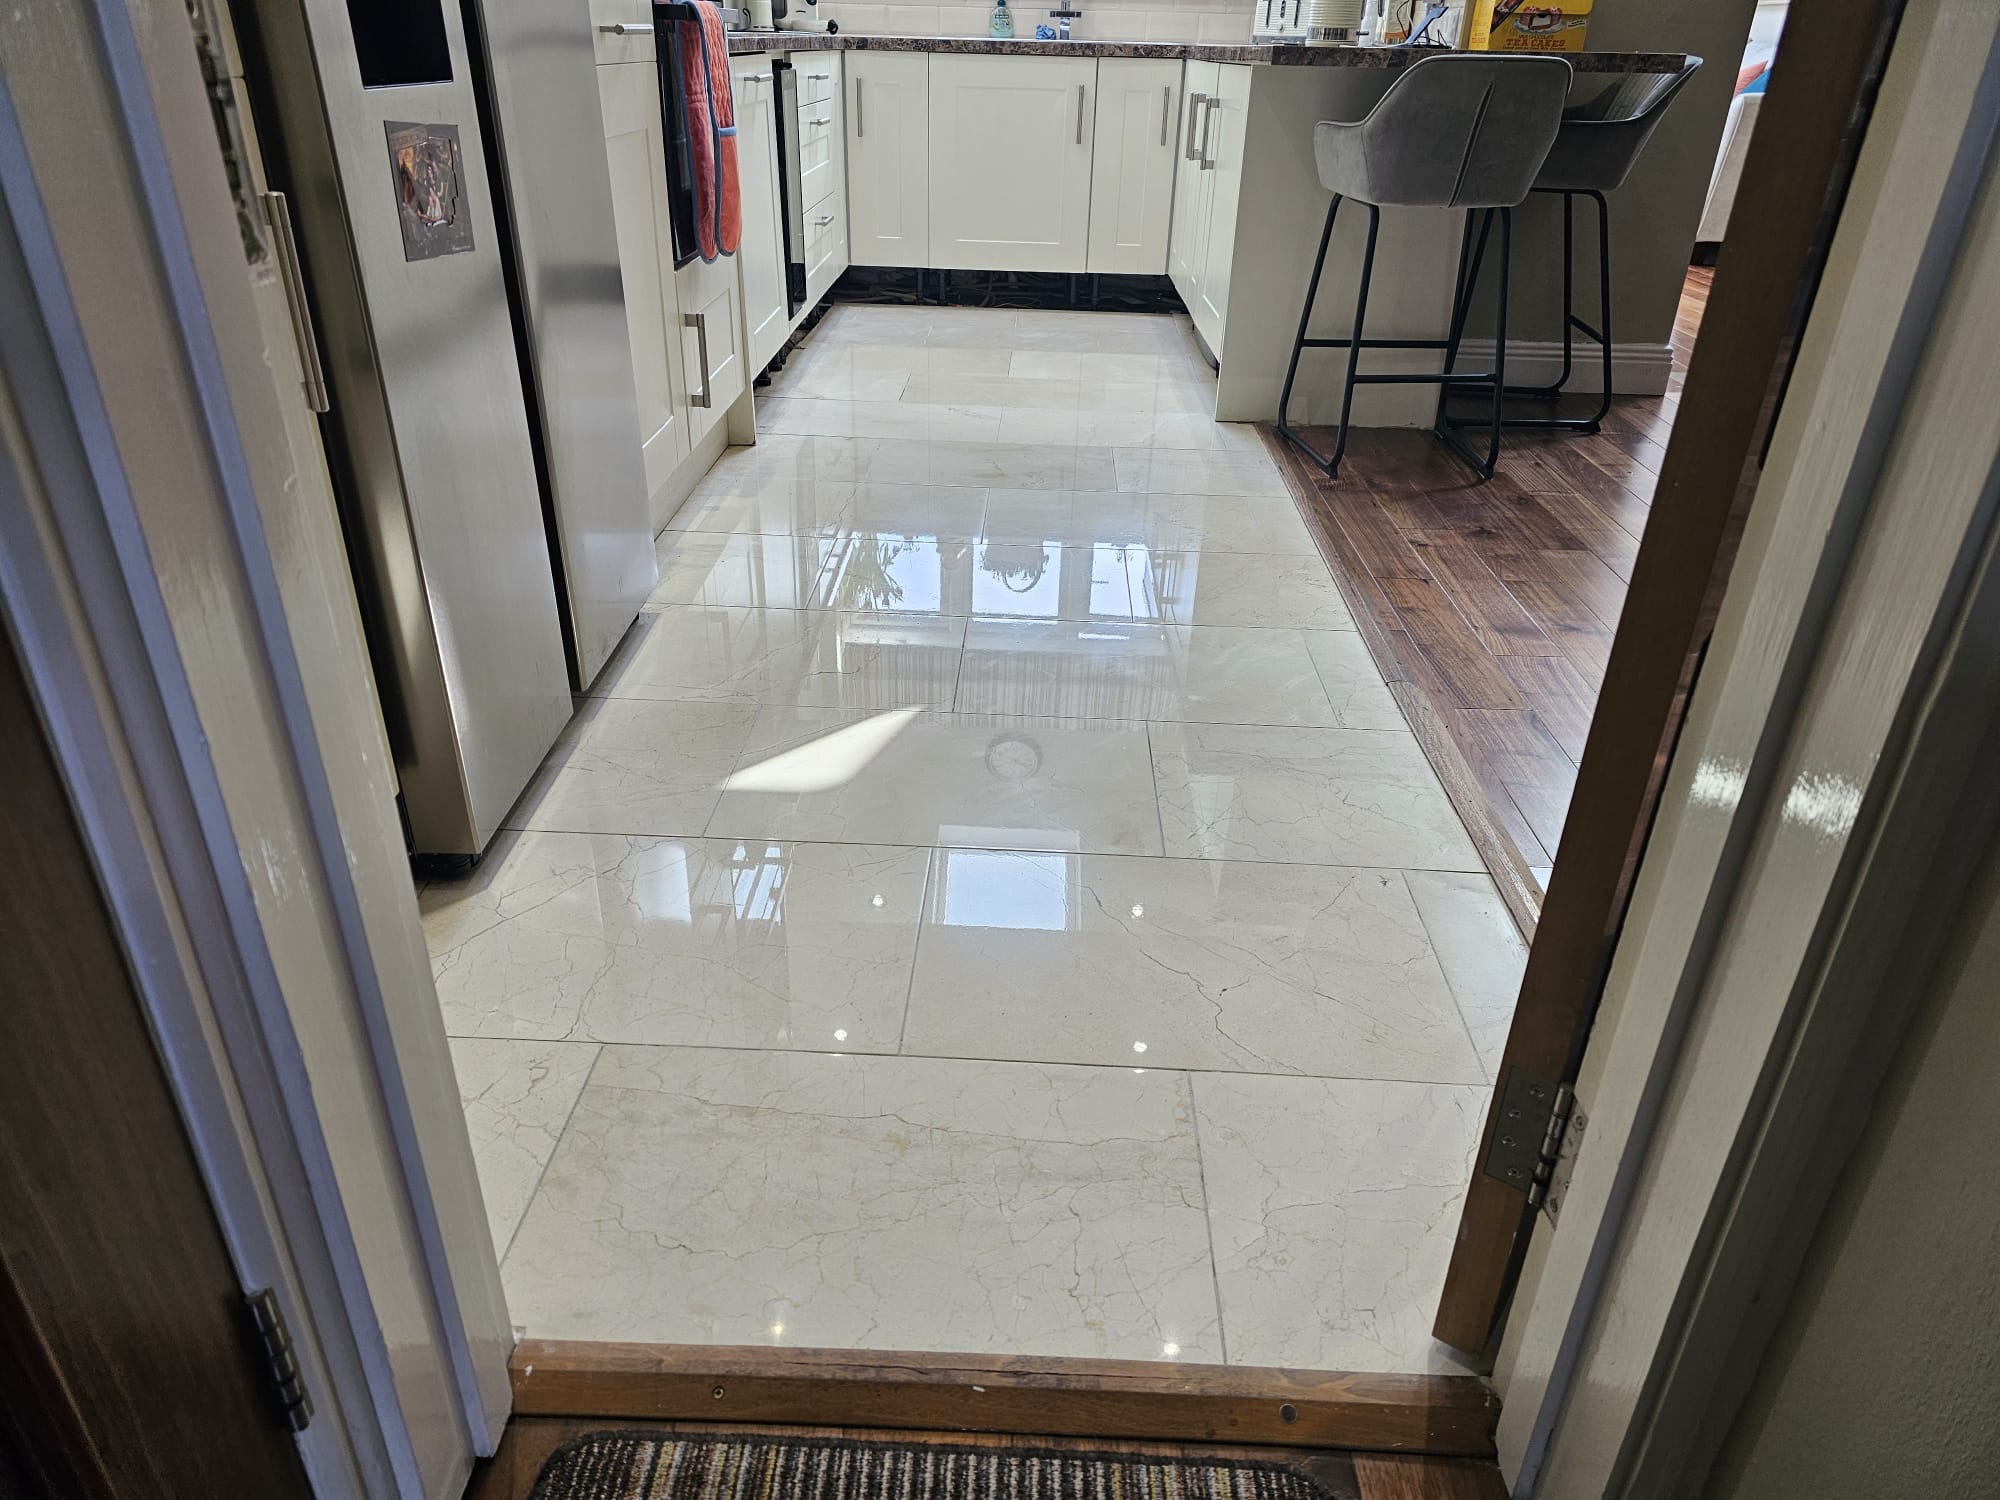
Polishing is fundamentally about smoothing the stone’s surface to the point where light reflects uniformly, creating the characteristic mirror-like finish. This process is distinct from mere cleaning; it is a form of light restoration. It involves using progressively finer abrasive materials and/or chemical compounds to smooth the microscopic peaks and valleys that develop on the surface. When the surface is perfectly smooth, the pores are tightened, which not only increases the shine but also makes the stone less susceptible to immediate dirt absorption and staining. A well-polished floor is easier to clean and maintain on a daily basis.
The goal of professional natural stone polishing is twofold: first, to mechanically or chemically restore the original factory finish or achieve a new, desired level of gloss; and second, to prepare the stone for effective sealing. The gloss on a marble floor can be achieved with a marble floor polishing powder, a sealer, an impregnator, some type of floor polish or by buffing the surface with a high speed floor burnisher and a diamond pad. While marble floor polishing can be attempted by DIY users, it is highly recommended to use a fully insured and highly regarded marble floor cleaning contractor to ensure the correct techniques and products are used, preventing irreversible damage to this expensive natural material.
Best Marble Polishing Technologies
Achieving a high-quality, durable, and deep gloss on a marble floor requires a combination of skilled technique and advanced technology. The most efficient marble floor cleaning technologies and polishing systems can vary slightly from country to country, but the fundamental mechanical and chemical principles remain consistent globally. Modern polishing is primarily carried out through two main technological approaches: mechanical abrasion (grinding and honing) and chemical crystallization (powder or compound polishing).
Mechanical Abrasion and Grinding
This is the most effective and aggressive method, used to remove deeper scratches, stubborn stains, and significant lippage (uneven tile edges) before polishing. To remove scratches and dull patches from any marble floor, the user has to use either diamond impregnated pads or special steel plates that grind the floor slowly.
- Diamond Grinding: This is the process of using heavy-duty, low-speed floor machines fitted with diamond-impregnated pads or resin discs. The process starts with a coarse grit (e.g., 50 or 100 grit) to cut away the top layer of damaged stone and remove scratches, then progresses through finer and finer grits (up to 400, 800, 1500, and sometimes 3000 grit). Each successive grit stage removes the scratches left by the previous, coarser grit, gradually smoothing the stone to a honed or semi-polished state.
- Diamond Impregnated Pads (Maintenance): For routine, lighter-duty maintenance polishing, machines are equipped with diamond-impregnated pads, often referred to as diamond abrasives, in very fine grits. When used with water and a high-speed floor burnisher, these pads micro-abrade the surface, eliminating light swirl marks and restoring a high degree of the existing shine without the need for heavy chemical treatments.
Chemical Polishing and Crystallization
Once the mechanical grinding has achieved a smooth surface, chemical processes are used to lock in the final, brilliant shine.
- Polishing Powders (Oxalic Acid Based): These powders, which contain abrasive fillers and often a mild acid like oxalic acid, are mixed with water to form a slurry. This slurry is worked into the stone with a floor machine and a natural fiber pad. The chemical reaction and the mechanical action of the abrasive powder on the stone’s surface create a micro-polished, high-gloss layer. These powders are highly effective but must be used and neutralized correctly.
- Crystallization (Magnesium Fluosilicate): This specialized process is favored in many commercial settings due to its high durability and brilliance. A liquid chemical (typically containing fluosilicates) is sprayed onto the floor and immediately buffed in using a floor machine equipped with steel wool pads. The acid reacts with the calcium carbonate in the marble, forming a hard, protective, and shiny micro-layer of Calcium Fluorosilicate. While highly effective for gloss, repeated crystallization can sometimes lead to a slightly waxy buildup or a loss of depth in the stone’s color over time.
How To Polish Marble Floors
The process of marble floor polishing is a systematic restoration that moves from deep cleaning and repair to final sealing and gloss achievement. It’s an involved, multi-stage operation best performed by trained professionals.
Deep Cleaning and Preparation
The first step is a thorough deep clean. The floor must be entirely stripped of old waxes, sealers, and surface dirt. This is achieved using a professional, alkaline stone cleaner and a low-speed scrubbing machine with brushes or non-abrasive pads. This step is critical because any remaining dirt will be ground into the stone during subsequent polishing stages, compromising the final shine. After cleaning, the floor is thoroughly rinsed and dried. Any chips, cracks, or deep grout lines must be repaired with color-matched epoxy or resin filler before proceeding to grinding.
Restoring the Surface through Honing
For floors with deep scratches, acid etching, or lippage, the full marble floor grinding process is necessary.
- Grinding: Using a rotary or planetary floor machine with diamond pads, the floor is ground starting with a coarse grit (e.g., 100 or 200) to flatten the surface, remove all damage, and even out lippage.
- Honing: The machine then progresses through finer grits (400, 800, 1500) to refine the surface. The 800-grit stage typically leaves a beautiful, matte honed finish, and the 1500-grit stage brings the surface to a high-satin sheen, which is the perfect base for the final polish. The floor must be thoroughly cleaned and dried between each grit change to prevent coarser particles from scratching the finer surface.
Achieving the High Gloss
Once honed, the final shine is applied using one of the technologies detailed above:
- Polishing Powder Application: A small amount of polishing powder is sprinkled onto a wet area of the floor to create a slurry. This slurry is worked into the stone for several minutes with a floor machine and a hog’s hair pad or white nylon pad until the desired gloss is achieved. The surface is then rinsed and buffed dry.
- Burnishing: The gloss can also be rapidly amplified by buffing the surface with a high-speed floor burnisher and a diamond pad (up to 3000 grit or higher). The heat and speed of the burnisher, combined with the ultra-fine diamond abrasives, mechanically buff the surface to a mirror shine. All marble floors have to be buffed on a regular basis to protect the gloss.
Marble Floor Grinding
Marble floor grinding is the most transformative part of the marble restoration process, often referred to as ‘lippage removal’ or ‘deep honing.’ It is a heavy-duty, water-based process designed to correct significant surface flaws that chemical polishing alone cannot resolve.
The Purpose of Grinding
The primary purpose of grinding is to establish a perfectly flat, uniform surface. Marble tiles are never laid perfectly level with each other; this slight unevenness is called lippage. Lippage not only looks unsightly and casts shadows but also makes the floor more difficult to clean and causes premature wear on the higher edges. Grinding physically shaves down the high points of the stone to match the low points, creating a monolithic, seamless surface. Furthermore, grinding is the only way to effectively remove deep scratches (gouges) and severe, long-term acid etching that has penetrated below the stone’s superficial layers.
The Process and Tools
Grinding requires specialized, heavy-duty planetary or rotary floor machines. These machines apply significant downward pressure and are equipped with metal-bonded or thick resin-bonded diamond abrasive segments.
- Metal-Bonded Grinding: This is the most aggressive initial stage, used primarily for lippage removal. The metal-bonded diamonds (low grits like 30, 50, or 100) cut into the stone quickly, removing the surface material. This step leaves deep, visible scratches that are then removed by the subsequent steps.
- Resin-Bonded Honing: Once the floor is flat, the process switches to resin-bonded diamond pads (e.g., 200, 400, 800 grit). These pads are designed to refine the surface, gradually removing the coarser scratch patterns left by the metal-bonded segments. By the 800-grit stage, the stone is smooth, matte, and free of all major defects. This multi-step process is crucial for a successful polish; skipping grits will result in a poor final shine where the deeper scratches are merely covered up, not removed. The grinding process is messy, involving a great deal of water and stone slurry, which must be carefully contained, collected, and properly disposed of by the contractor.
Marble Floor Sealing
After the physical process of cleaning and polishing is complete and the floor’s surface is restored to a magnificent shine, the most vital protective step is marble floor sealing. This process is the frontline defense against the inevitable spills and dirt that an active floor will encounter.
Why Sealing is Essential
While marble is hard, it is also porous due to its natural, crystalline structure. A polished marble floor’s pores are tighter than a honed floor’s, but they are still present. This means unsealed marble acts like a sponge, quickly absorbing liquids—especially oils, dyes, and other colored substances—leading to deep-set stains that are extremely difficult, or sometimes impossible, to remove. Marble floor sealing is the process of applying a chemical protector to the stone’s surface to slow down this absorption rate. After the initial polishing, the surface has to be sealed with a protector to avoid staining in the future.
Types of Sealers
There are two main types of sealers used in the industry:
- Impregnating Sealers (Penetrating Sealers): These are the overwhelming choice for marble floors. Impregnators are deep-penetrating formulas, typically solvent- or water-based, that soak into the stone’s microscopic pores. They do not sit on top of the stone, meaning they do not change the look, sheen, or breathability of the marble. Instead, they line the internal pore walls, creating an invisible barrier that repels water and oil, thus buying the user time to wipe up a spill before it penetrates the stone. A high-quality impregnating sealer, often referred to simply as an impregnator, provides superior, long-lasting protection against internal staining.
- Topical Sealers (Surface Coatings): These products sit on the surface of the stone, creating a visible, protective film, similar to a wax or polyurethane finish. While they offer good protection against abrasion and staining, they can dull the stone’s natural appearance, trap moisture within the stone, and wear off unevenly, leading to a plastic-like appearance. They are rarely recommended for high-end, polished marble.
The correct choice of sealer is crucial for long-term marble floor sealing success and should only be a non-acidic product.
How To Maintain Marble Floors
Effective maintenance is the key to preserving the high-gloss shine achieved through professional marble floor polishing and extending the life of the marble floor sealing. Marble requires a consistent, gentle care regimen to prevent damage and costly future restorations.
Daily and Weekly Maintenance
The single most important step in marble floor maintenance is routine dust mopping or vacuuming. Fine grit, sand, and dirt are the primary causes of dulling and surface scratches. These particles act like sandpaper under foot traffic. Therefore, daily removal of dry soil is essential.
When wet-cleaning is required, only neutral pH, non-acidic cleaning products should be used. Acidic cleaners (like vinegar or many general-purpose bathroom/kitchen cleaners) will immediately etch and dull the polished finish. The most effective marble floor cleaning products are professional-grade stone maintainers. Faber Neugel is by far the most cost effective marble floor maintainer ever, formulated specifically for marble to clean effectively without damaging the surface or compromising the sealer.
Protecting the Gloss
To maintain the mirror-like shine, all marble floors have to be buffed on a regular basis to protect the gloss.
- Buffing/Burnishing: This involves running a high-speed burnisher over the clean, dry floor, typically using a specialized polishing pad (like a natural fiber or very fine diamond-impregnated pad). The friction and heat generated by the burnisher re-align the crystal structure on the surface, making the shine more resilient and restoring a degree of the lost gloss. For commercial floors, this might be a weekly requirement; for residential, a monthly or quarterly burnishing might suffice.
Immediate Spill Response and Chemical Selection
Immediate response to spills is paramount, especially for acidic liquids like wine, sodas, citrus juices, or tomato products. The stone’s sealer slows absorption but does not stop it indefinitely. Spills should be blotted (not wiped, which can spread the stain) immediately with a clean, dry cloth.
Crucially, only non acidic marble floor polishing products should be used on it. This applies to all cleaning products, not just polishing compounds. The CaCO3 (Calcium Carbonate) in marble is highly reactive to acids, and even a single use of an acidic cleaner can permanently damage the polish, necessitating professional re-honing.
While basic marble floor cleaning can be done by DIY users, it is highly recommended to use a fully insured and highly regarded marble floor cleaning contractor for the initial restoration, grinding, polishing, and sealing processes, as the necessary tools and expertise are significant. Regular professional maintenance checks are also advised to ensure the sealer is intact and the floor’s beauty is sustained for decades.